How to Attach a Timber Frame Pavilion to Your House: Complete Guide
Many homeowners love the idea of spending more time outdoors, but Canadian weather, limited space and disconnected patios often make backyards feel underused. A timber

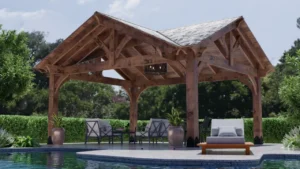
Many homeowners love the idea of spending more time outdoors, but Canadian weather, limited space and disconnected patios often make backyards feel underused. A timber frame pavilion attached to the house transforms these spaces into practical, year-round extensions of the home. It provides shelter from sun and rain, creates a natural flow from indoor to outdoor living areas and becomes a place where families can gather, cook and relax together.
Beyond aesthetics, attaching a pavilion directly to the house improves functionality. It allows for stable beam installation, secure pavilion brackets and efficient use of space without disrupting landscaping. Homeowners quickly notice the difference: furniture stays in place, lighting and amenities can be added seamlessly and the backyard finally feels like a real extension of everyday life.
Here are the steps to successfully attach a timber frame pavilion to your house:
The first step is evaluating your existing home structure to determine the best attachment points. Understanding your house’s framing, roofline and exterior materials is crucial for creating a home extension that is both stable and visually cohesive. You’ll need to ensure proper clearance and alignment with doors, windows and outdoor spaces to maximize functionality.
Planning also includes assessing local building codes and zoning restrictions. Obtaining the proper permits before starting your project can save headaches later. By carefully planning your home extension, you set the stage for a smooth beam installation process and a structurally sound timber frame pavilion.
Choosing the right timber is critical for long-term durability. Cedar, Douglas fir and engineered timbers are popular choices because they resist decay, insects and harsh weather. The timber you select affects beam installation and overall structural stability, making it essential to pick strong, high-quality wood.
Consistency in timber species also improves the visual appeal of your home extension. Matching posts, beams and structural elements ensures your timber frame pavilion integrates seamlessly with your home. High-quality timber also supports heavy rooflines and accommodates additional features like pavilion brackets, lighting or ceiling fans.
Pavilion brackets provide secure connections between beams and your home, preventing movement and ensuring safety. They are typically fastened to wall studs or reinforced ledger boards and are essential for distributing structural loads evenly across the pavilion.
Many homeowners underestimate their importance, but correctly installed pavilion brackets protect your timber frame pavilion and home extension from shifting or damage caused by wind, snow or everyday use. Using the right brackets allows you to maintain clean sightlines while securing beams and roof connections safely.
A stable, level foundation is vital for a successful installation. Clear the area of debris, level the ground and plan drainage to prevent water from pooling near posts. In Canada, frost depth is a key consideration: footings must extend below the frost line, which varies by region across the country, to prevent heaving and shifting over time. Common foundation options include concrete footings, helical piles or poured piers, depending on your soil conditions and local code requirements. Consult your municipality before breaking ground.
Marking the exact locations for posts and beams before construction helps guarantee alignment with your house, minimizes adjustments mid-build and ensures your pavilion sits perfectly within your backyard layout.
Accurate beam installation forms the backbone of a secure pavilion. Lift beams into position carefully, ensuring they are level and properly spaced. Temporary supports or hoists can help maintain alignment while attaching them to the house.
Each beam should be secured using the appropriate pavilion brackets and fasteners. Proper installation ensures the beams carry the roof load evenly, providing a solid foundation for your home extension. Attention to detail here prevents sagging, uneven rooflines and long-term maintenance issues.
Connecting your pavilion to the home requires careful alignment with the roofline. Install a ledger board on wall studs for a secure anchor, then attach your timber frame pavilion using pavilion brackets. Proper flashing and sealing protect both the house and the pavilion from moisture intrusion.
A well-attached pavilion distributes loads evenly and integrates naturally with your home extension. Correct beam installation and bracket placement ensure the structure is safe, stable and visually seamless, making your backyard feel like an intentional and permanent living space.
The roof is the key to protecting your pavilion and home. Choose materials that complement your house and provide proper water runoff. Applying sealants and flashing at connection points safeguards both the home extension and timber structure.
Treating and staining the wood enhances durability and protects against Canadian weather. A correctly installed roof with well-placed beam installation and secure pavilion brackets ensures your timber frame pavilion remains a reliable, all-season outdoor space.
Once the structure is secure, you can add features such as outdoor kitchens, lighting or heating systems. Electrical wiring can be routed through beams for a clean, professional appearance. However, all electrical work must be planned and inspected by a licensed electrician, as this is an important safety precaution for any outdoor structure exposed to moisture.
Planning conduit routes during construction makes future upgrades far easier and avoids costly retrofitting later. Coordinating amenities with the timber layout from the start ensures both safety and efficiency, turning your pavilion into a fully functional extension of the home.
Homeowners often overlook permits, choose undersized beams or misalign pavilion brackets, leading to structural issues. These mistakes can affect safety and long-term stability of your timber frame pavilion.
Ignoring proper alignment with the house or failing to treat timber can also result in water damage, sagging or aesthetic problems. Following correct beam installation and bracket placement prevents these issues and ensures your home extension remains durable and visually appealing.
Also Read: Custom Timber Frame Kits for Efficient Construction
Check that all beams are level, brackets are flush and fasteners are secure. Staining or sealing the timber improves longevity and enhances the look of your timber frame pavilion.
Attention to small details, like matching timber finishes and coordinating rooflines, elevates the overall home extension. Proper planning and execution now prevent maintenance problems later, ensuring your backyard remains a functional, beautiful space for years.
Also Read: Why Choose Douglas Fir for Your Outdoor Pavilion?
Attaching a timber frame pavilion to your house creates a practical, year-round home extension that enhances outdoor living. With careful beam installation, quality pavilion brackets, and attention to detail, you can build a structure that is durable, visually appealing and seamlessly integrated with your home.
If you’re ready to transform your backyard with a professionally designed timber frame pavilion, reach out to us today. At NORWEH Timber Frame, we specialize in custom outdoor structures that combine strength, craftsmanship, and long-lasting performance, giving your home an outdoor space built to enjoy for years to come.
Many homeowners love the idea of spending more time outdoors, but Canadian weather, limited space and disconnected patios often make backyards feel underused. A timber

Outdoor living in Canada continues to evolve beyond seasonal patios and temporary shade solutions. Homeowners are increasingly approaching backyard upgrades as a full backyard makeover,
One winter is all it takes. Heavy snowfall settles in, temperatures swing wildly, and suddenly that backyard structure you loved in summer starts to sag, shift, or crack. Many homeowners discover too late that their gazebo structure was never designed for real Canadian weather.